
So we are back in another lockdown. This one might feel harder too because we are no longer enjoying those long hot summer days. The winter months can feel a bit glum. The garden can feel the same now that the summer flowers have died back, along with the short, cold, wet days. However, all is not lost. There are plenty of things to be getting on within your garden to keep you busy during the new lockdown; spending some valuable time in nature and breathing some ever important fresh air. I will give you some task to do in the garden over the winter from easy jobs the whole family can do to more challenging jobs for those garden warriors! Just remember to wrap up warm and have a mug of hot coco ready for when you finish.
Giving back to nature
Skill level 1 - 4 Time 10 mins
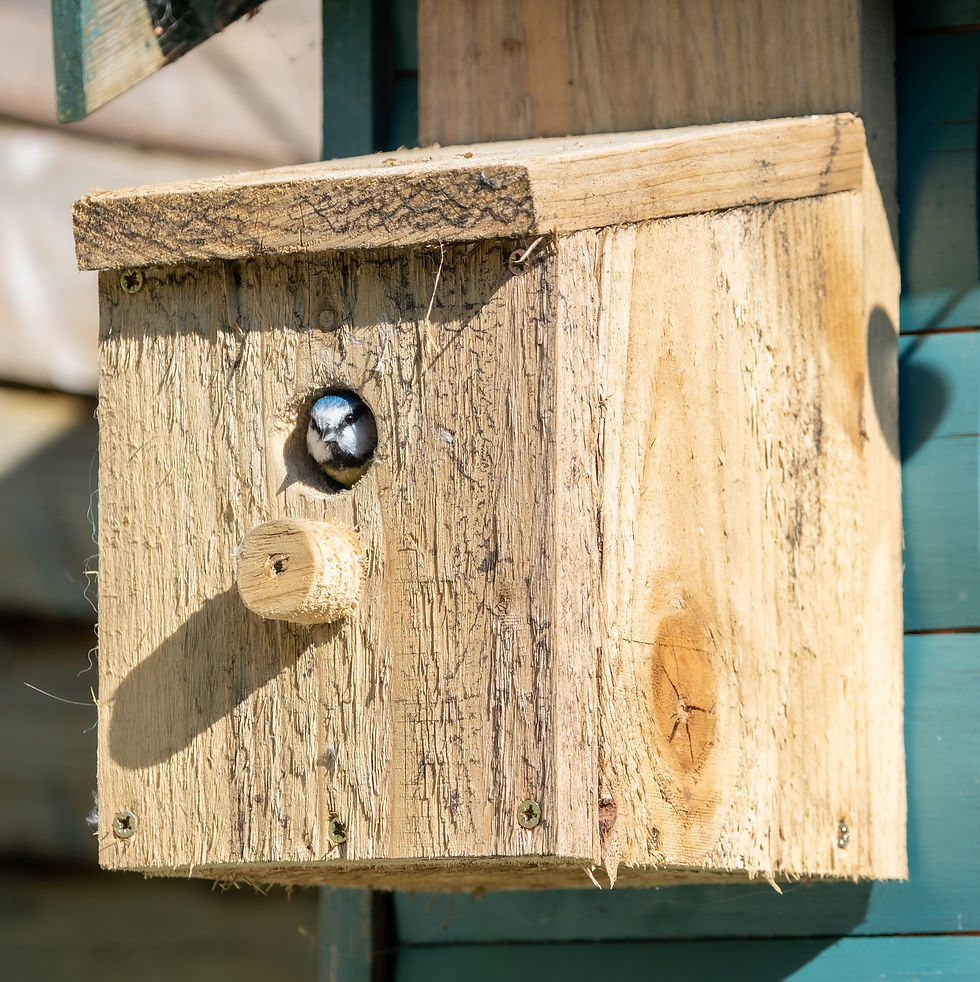
The winter can be a really challenging time for our little feathered friends. Feeding the birds or building a birdhouse is not only really rewarding for us but it is a lifesaver for birds during the winter months. Birds lose heat easily, so we need to provide them with the right feeds (and plenty of it) to keep them toastie.
It's so lovely coming downstairs in the morning, looking out the kitchen window at all the birds hopping about while my coffee is brewing. I've noticed they all have their favourite snack. See if you and your kids can spot which birds favour which treats.
You don't have to have a large garden to enjoy feeding the birds either. You don't even have to have a garden at all. You can use a window feeder and bring the birds to you. Even in the cities, there are plenty of small birds looking for a fatty snack.
Now you may be wondering what to feed them? Sunflower seed, Nyjer seeds, Peanuts and Fat balls are some of the best things to feed the birds during the winter months. This is because the foods are high in the essential fats and oils needed to keep the birds energised and warm. When using peanuts please make sure that you only used peanuts specifically for birds! Salted or unsalted peanuts from the supermarket may harm the birds. However, if they happen to slip into your basket for a late night snack of your own, I won't tell.
Another fun task to help the birds ready for the spring is to build a birdhouse or clear out the nest from the previous season. I was lucky enough to have a successful fleg of Blue tits from mine in the first year! The RSPB have a great template for you to use. Only do this if you already have the materials lying around at home to follow the new lockdown rules.
It is important to clear the nest out for previous seasons. This is because they can harbour nasty pest and bacteria that can be harmful to the birds. It's easy to do, just open the top, remove any nest and debris, then pour over boiling hot water.
It's not only birds that we can give a helping hand too. Hedgehogs are in a slow decline and there is a really simple way to help them out. When you are clearing your autumn leaves, leave a pile in a quiet corner. A resident Hedgehog may just make that his home for the winter.
Dig over the boarders
Skill level 1 Time 2 - 5 hours
Digging over the boarders is a really valuable task in preparation for the summer. If you have the budget it is also a really good time to mulch the borders too. Here we will touch on both subjects. I will admit, that photo was taken in the summer, but you get the picture.
If you have a very clay soil, digging over the border during the winter is a great task to do. Not only will you put on a sweat which is great for your physical and mental wellbeing, but it will also help with the soil structure for the spring (check out my video on the beardy gardener Instagram all about soil). If you dig over your borders now then the frost will break those large clumps down for you over the winter. Win, win! Once the soil has sufficiently broken down or if you have very sandy soil then you can think about mulching the borders.
This is another great task for the winter and a great one to get the kids involved with. Mulching the borders will increase the nitrogen content in the soil, help with water retention and aid in weed suppression depending on which mulch you choose. I would recommend either mushroom compost or composted bark mulch.
Mushroom compost is the spend growing matter of mushroom farming. It is made up of farmyard manure, hay, and any old mushrooms that did meet the cut. It tends to be a cheaper mulch and it great at improving the quality of the soil and feeding the plants. I will always use mushroom compost on new boarders to help give the plants a much needed boost, helping them to develop. You will want to lay the mulch around 3 inches thick. When laying the mulch, make sure that you keep the base of the plants clear. Any mulch piled up against a plant will burn the plant. You will expect to get 1 - 2 years out of this mulch.
Composted bark mulch is, well, composted bark. It is great at moisture retention and weed suppression, however, it doesn't add much to the soil. This is a great option for established borders where the main goal is to reduce the need to water a weed in the summer months. It also lasts a lot longer. If you lay composted bark mulch around 3 inches thick then you should expect to get 3 - 5 years out of it. Again make sure to keep the base of the plants clear.
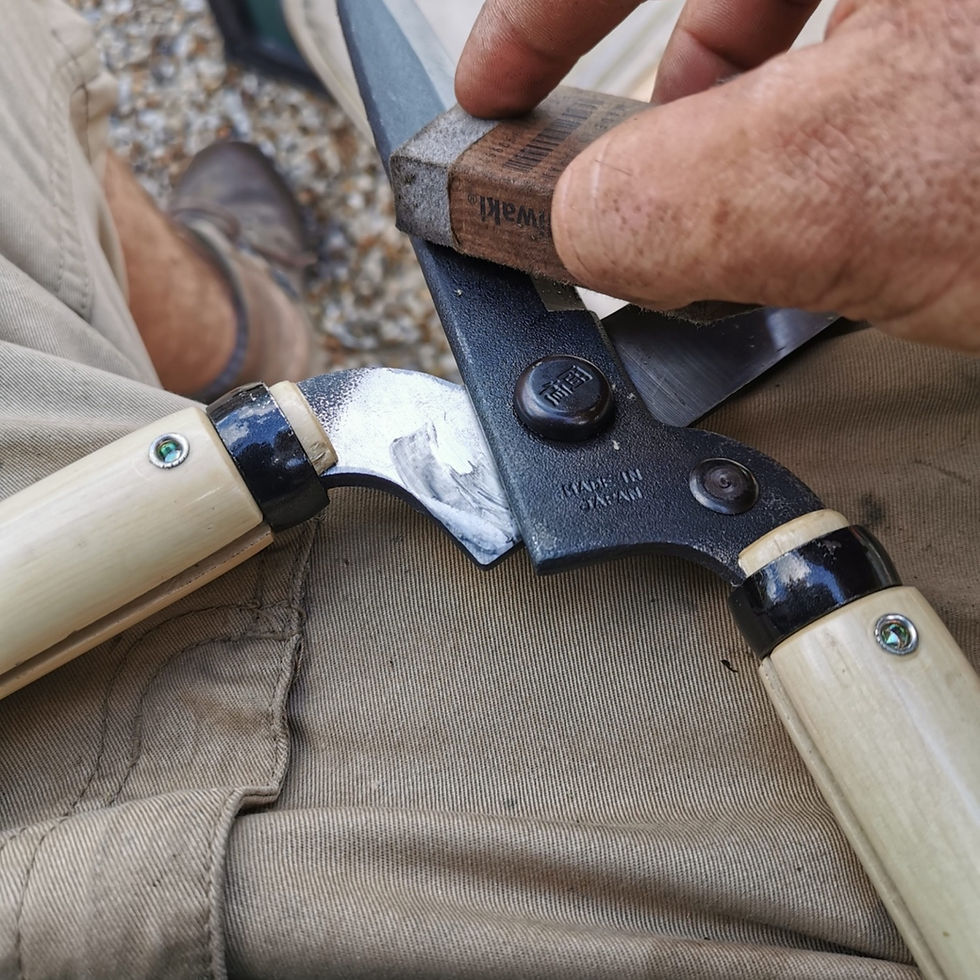
Clean and sharpen tools
Skill level 4 - 5 Time 20 mins Not suitable for children

If it's too wet to spend a day in the garden then don't fret. There are still really beneficial jobs to do that can be done indoors. One of which is the cleaning and sharpening your tools. Not only will this keep your tools in good shape and prolong the life but it will also benefit the garden itself. Having blunt cutting tools will result in poor cuts. This can damage the plant making it more susceptible to diseases. Couple that with dirty tools, which may be carrying the very diseases you'll want to avoid could spell disaster.
It's easier than you think and can even be done with household cleaning products you can buy in the supermarket.
The first step is to clean the tools. One option is to use The Pink Stuff which is available in most supermarkets, a bucket of warm water and a scouring pad. If the blade is removable then it is best to do so. If not then it's no bother. Scoop a good amount of the pink stuff on your scouring pad and begin to scrub. You notice that all the black sap build up will begin to disappear. Add some warm water and continue scrubbing, all over, until the tools look brand new! An alternative option, one of which I use on an almost daily basis at work is the Niwaki crean mate . Use with the Niwaki Camellia oil and you have a method of cleaning your tools that couldn't be easier.
Next, you need to sharpen your tools. This is best done with a sharpening stone . First, apply a little Camellia oil to the blade for best results. Then try to keep a 14 degree angle and past the stone down the blade, only moving in one direction. Continue this till you have a new edge, then make one pass with the stone on the other side of the blade to knock off the burr.
If your tools are particularly damaged then Niwaki offer a tool repair service.
Plan and/ or plant a new border
Skill level 6-8 Time a few days

Another really satisfying job to do on the wetter days is to look at designing a new border. It can be quite a daunting task not knowing where to start so I'll do my best to break it down into easily digestible chunks.
The first step is to look at the goal. What are you hoping to achieve? Is it to bring interest in the winter with a winter garden, or perhaps make the dull shady corner a place to enjoy. Maybe you are looking ahead to design a herbaceous border to make the neighbours sneer with jealousy in the summer

months.
Right, so you know what you want to achieve. Now we need to look at the location. Where will my new border fit in best in my garden? Could it be placed in a position that not only adds a baggage load of interest but also solves a maintenance nightmare at the same time? Take for example this bank pictured on the right that used to be part of the lawn. The position depends on the goal of the border your designing. If it is to bring a spark to the shady corner, then of course, it will be in the shady corner. If it is a dancing centrepiece then think about where you spend most your time in the garden. Beardy top tip - try to avoid planting really bright interesting plants in the foreground of your garden. Doing so will create a barrier for your eyes. In other words, your eyes won't look past the shiny plant in the foreground. Adding interesting plants to the background will draw your eyes down the garden adding depth.
Then, of course, we need to look at the plants that are suitable. You'll want to look at the light levels in your chosen position, either full sun, partial shade or shade. Pick plants that will grow well in the light level they will receive not just tolerate it. Plant taller items to the rear and medium and small items to the front. Try adding some hight to the front of the border to add depth but don't go crazy. You will also need to choose plants that are suitable for your soil type and ph level.
When planting your border soil preparation is absolutely key. If the ground that your planting is too compacted then the plants will struggle to develop their roots leading to a poorly performing or, well, dead plant. Begin by thoroughly digging through the border removing and large stones and any old roots. If the soil is really poor then add some soil conditioner.
When planting make sure the hole is 3 times the size of the container they came out of. This is to ensure that the soil is nice a loose around the roots to help them develop. Sprinkle some Vitax Q4 which is a slow release fertiliser in the planting hole, adding some much needed trace elements to help the plant develop in its first year. Avoid using Vitax on ericaceous plants. Then carefully push the soil back in the hole and press down around the plant filling in all the gaps. Finally, water the plant in. Not only will this give the plant a drink, but it will also help wash the soil around the roots.

These are just a few examples of things that could keep you busy during the winter months. Keep an eye on the Instagram feed for more ideas and to see what I'm up too. Now stay safe and keep your head up. The spring and better times will be here soon.
With love,
Fraser